Elastic is a wonderful thing. It moves with you, expands when you need it to, and keeps your pants up. Who could ask for more!
There are several types of elastic waist bands available on the market - widths ranging from 1/4" to 3"+, black or white, regular or non-roll, sold by the yard, sold by the package... You could feel a little overwhelmed when in the notions isle trying to figure out what to buy. The type you need depends on how you want to use it.
For circle skirts I tend to use a package of 1" wide non-roll which comes in a 36" length in either black or white. It will go inside the fabric casing you'll make for the circle skirt, so unless your fabric is somewhat transparent the color of the elastic doesn't really matter. For instructions on elastic waist bands in casings, go here. One inch non-roll is also a good type of elastic for adding snugness to bras and belts or other costume accessories, which would be sewn either between the base and the lining, or sewn on the lining itself.
For trumpet skirts I like to use stiffer 3" wide elastic, because I feel like it gives the top of the skirt a nicer line. This elastic is sewn onto the inside of the trumpet skirt using a wide zigzag stitch to hold it in place (no casing). Elastic isn't always necessary for trumpet skirts because they're made of stretch fabric already. But for added comfort or a better fit, you may choose to add an elastic waist band to a finished trumpet skirt you've bought or made.
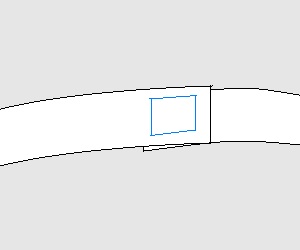
You could choose to have an elastic waist band in stretch fabric casing on your trumpet skirt, much like L Rose Designs does, and to do so, follow the circle skirt casing instructions, using your upper hip measurement +1 as the length of the casing, and the 1" non-roll elastic.The following method is intended for attaching elastic to the inside of a finished trumpet skirt with a wide zigzag stitch. The first step is to fit your elastic to your upper hips. Pin the elastic to the desired tightness, make sure you can still get it on and off, and put a pin where one end of the elastic lines up with the other end of the elastic. Check out the hook and eyes page to see this trick described in more detail. Then trim the overlapping end to 2" and straight stitch a square over the overlap.
Usually you can determine the right tightness for the elastic by feel, but if you're still having trouble, here's a method that may help you. Put the elastic around your lower hips (the largest part), and using both hands pull the elastic till it can't get tighter. Use one end of the elastic to mark with a pen or a straight pin where it lays on the other end of the elastic. This is the maximum tightness you can do while still being able to get the skirt on and off. The minimum tightness would be if the un-stretched elastic is the same length as the circumference of your upper hips. Mid way between these two lengths is probably your ideal tightness. Mark both lengths with a pin, and pick a length in between. If you're still unsure, you can safety pin your elastic instead of sewing it closed, follow all of the sewing instructions below, and be able to tighten or loosen it later as needed.
Now put your elastic band into your trumpet skirt, and line it up about 1/4 to 1/2 an inch below the top of the skirt - so that the elastic can't be seen when worn. Use Button and Craft thread that is as close as possible to the light or darkness of your skirt (colors are limited - black, white, grey, cream, brown). If you have to, you can use regular thread, but the stitches may break over time. Holding the elastic band in place with your hands (no pins), stitch above and below the elastic, nicking the fabric only. It is very important not to let the stitches catch on the elastic itself. The zigzag is travelling to the right, but every small stitch into the skirt goes to the left.
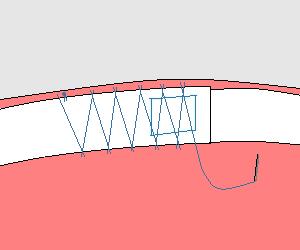
Keep the stitches evenly spaced, and don't tug on the thread too much. The stitches shouldn't be loose, but should not be tight enough to dent the skirt and look bad on the outside. Try to avoid harming the beading on the outside of your skirt as you make these stitches. When you've gotten all the way around, knot your thread and you're done!