
Trumpet skirts, also called Mermaid skirts, are fitted through the hips and thighs and flare at the bottom. In bellydance costumes, they're typically made of a stretch fabric, although with the strategic addition of a zipper they could be made of a non-stretch fabric as well.
There are four main ways to make a trumpet skirt:
~Rectangles and Triangles
~Rectangles and Triangles Alternate Method
~Tube and Circle
~Princess Seams
Relax, I'll explain.
Believe it or not, this is how a lot of clothing was made "back in the day". Check out 16th Century Ottoman Turkish clothing - they're made out of triangles and rectangles all sewn together. Why? Because fabric looms were very small back then, and fabric took a lot of work and cost to make. Having straight edges to each panel of fabric causes less waste. This was great back then, and it's still great today.
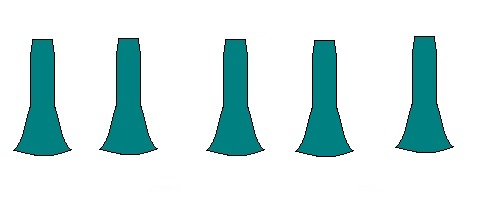
To make a trumpet skirt with rectangles and triangles, you're going to have an odd number (5, 7, 9) of rectangles the length of your skirt, and the same number (5, 7, 9) of pie-pieces sewn in between them. The correct term for the pie-pieces or triangles is "gores". The angle and length of gores is up to you, but I recommend 45 degrees (take a square piece of paper and fold it into a triangle - that's 45 degrees). As you can see in the picture, the rectangles are slightly narrowed at the top - this is to make it narrower at the waist and wider at the hips.
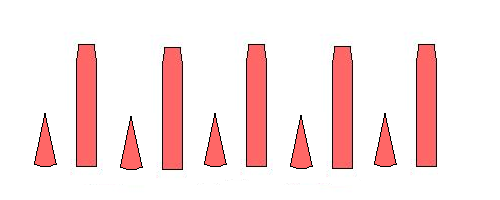
Why an odd number of each type of panel? Because you want the very front of the skirt to be a rectangle - on either side of which you could choose to put a slit instead of a gore, and because you want the very back of the skirt to be a gore - which you could make a larger triangle to add swooshiness (that's a scientific term).
The finished product is going to fit your dimensions, but in order for our stitches to have some fabric to hold onto, you need to add a "seam allowance" around each panel. I like to use a 1/2 inch seam allowance - meaning that I add a total of 1 inch to the width and length of each panel to get the finished product to fit me.
New Addition! I've added the Stretch Ratio of your fabric to the formula below. I talk about this a little on the Materials Page. It's basically a way of measuring how stretchy the fabric is. To determine your fabric's Stretch Ratio, lay it flat on a table. Somewhere in the middle of the fabric (not near a cut edge) along the horizontal grain (for one-way stretch fabric - the stretchy way), measure 10". Put a pin on either side of that span to mark it. Stretch the same span of fabric against your lap or any other body part to the desired tension (tightness) you want your garment to have. Have a friend measure the new distance between the pins. Most fabric will have a stretch ratio of around 30% (meaning 30% more length when stretched, aka 130%) - in other words for 10" unstretched, it will be 13" stretched. For that Stretch Ratio we're going to use the number 1.3 in our formula below. If your 10" of fabric becomes 15" when stretched, you'd use 1.5 in the formula below.
So now we get down to the formulas:
N = odd number of rectangles you choose
Stretch Ratio = (stretched fabric length) / (unstretched fabric length)
H = (the circumference around the largest part of your lower hips) / (Stretch Ratio)
L = the desired length of your skirt PLUS ONE INCH
W = Width of rectangles (to be calculated)
W = (H + N) / N
So you will now cut out N rectangles that are L long and W wide. (Tip: Some fabrics, like velvet, have a definite up and down orientation. Make sure all of your rectangles lay the same way.)
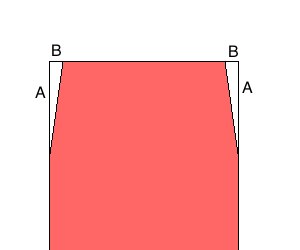
U = (the circumference around your upper hips for the top of the skirt) / (Stretch Ratio)
A = the distance between where you measured U and H, PLUS 1/2 INCH
B = the width of the taper triangle you will cut (to be calculated)
B = (H - U) / (N * 2)
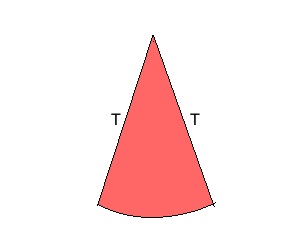
And now to make the flare on the bottom, decide where you want the flare to start (typically starts at the knees). Also, choose any angle you want for the top (I like 45 degrees). The larger the angle, the fuller the flare.
We want our gores to have sides that are T long. Taking a string or your fabric measuring tape, measure T inches from a set point, and swing the end of your string along the fabric to get the curve of the hem. You want the point of your triangle to point vertically along your fabric (for velvets that have a definite up direction). To make this easier, you can cut out your own pattern on a piece of newspaper or butcher paper and pin it to your fabric to make all the triangles. (Be careful, newspaper ink can stain.)
Now sew all your pieces together in order - rectangle, triangle, rectangle, triangle, etc. Pin the pieces together, good sides facing each other, with the straight pins perpendicular to the edge of the fabric. Ideally you would use a Serger - a complicated type of sewing machine that uses four large spools of thread and trims seams as it sews them. Most people don't have one, and I usually just do a straight machine stitch. (Tip: don't pull your stretch fabric as you sew the seams - it will cause wavy seams. Let the sewing machine foot move the fabric.) The last step is to fold over and zig-zag stitch the waist and the hem. Zig-zag stitches can stretch with the fabric. If you do a hand sewn diagonal stitch on top of this with seed beads, the machine zigzag stitch will never been seen.
That all sounds like a lot of work, doesn't it? It is. They're all easy steps, but there are a lot of them. If you're making a costume from scratch and you want the skirt fabric to match the bra you've made, it's worth doing. But if you aren't trying to match an unusual fabric, I suggest that instead you buy a skirt similar to this from L Rose Designs. They are of an excellent quality, come in a wide variety of colors and fabrics, and are worth every penny. I have one of theirs in Navy, Burgundy, and Tan velvet.
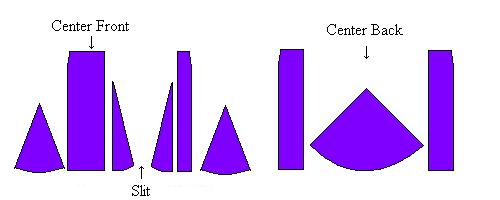
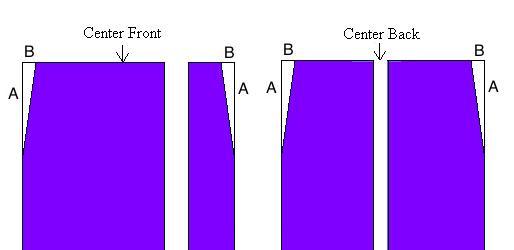
Several of the designer costumes I've bought have trumpet skirts made of rectangles and triangles, but they're a somewhat different configuration. There are 4 rectangles, two in the front, and two in the back. The two back ones are the same width, with a center back seam (optional location for a zipper). The two front ones are not the same size. One is wider than the other so that the seam between them lines up with one of the legs and remains open on the lower half as a slit. The outer sides of each of the rectangles will be tapered at the top to hug the upper hips. There are long narrow gores attached to the edges of the front rectangles on the slit to give the skirt more swooshiness. There are roughly 60 degree gores on the sides, which start around knee height. And then there is a 90 degree large gore in the center back that starts just under the butt.
Stretch Ratio = (stretched fabric length) / (unstretched fabric length)
H = (the circumference around the largest part of your lower hips) / (Stretch Ratio)
L = the desired length of your skirt PLUS ONE INCH
Wb = Width of BACK rectangles (to be calculated)
Wb = (H + 4) / 4
Cut out two identical rectangles that are Wb wide and L long. These will be your back left and back right panels. For the front two panels, you may want to take a measuring tape across the front of your pelvis and decide exactly where you want the slit to be. Maybe for a left slit you want the right panel to be 2/3 and the left to be 1/3 of the total distance. So for 40" lower hips, the front half is 20", making the right panel 13 1/3" wide PLUS 1 INCH, and the left panel would be 6 2/3" wide PLUS ONE INCH. (Remember, you need to add an inch to the total width of each panel for 1/2 inch seam allowances.) Or maybe instead you want the right side to be 3/5 and the left to be 2/5. It's really up to you. Decide on the ratio you prefer and the leg you want the slit to be on, and cut out one large and one small front panel that are L long. The total width of your two front panels will be the same as the total width of your two back panels.
To add the taper of the sides of your front and back panels, follow the directions below for the Cone and Circle mini skirt. Remember - the center back seam edges do not get tapered, and the front slit seam at the top does not get tapered. Only the sides of the four panels that will end up on the side seams get tapered.
The long narrow gores for the slit will start where you want the slit to start (mid thigh, right above the knee, somewhere in between) PLUS ONE INCH and be around 30 degrees. Use the method listed above for using a string or measuring tape to trace your triangles. Cut out two identical triangles, one for the left and right sides of the slit.
For the side gores, I recommend 60-70 degrees, but it's really up to you. They should start at your knees and go to your hem PLUS ONE INCH for seam allowance. Cut out two identical ones, one for the right side and one for the left side.
The back center gore will be a 90 degree triangle. Measure from where your butt ends and your legs begin in the center back of your butt, to the desired hem of your skirt, and ADD ONE INCH.
Sew your pieces together in order - triangle, rectangle, triangle, etc. Fold over the raw edges of the waist, hem, and slit edges and zig-zag stitch (or straight stitch for everything but the waist).
I don't know of any vendors who sell skirts of this style by themselves. They're always part of highly beaded costumes. I'm wearing a skirt I made in this style in this video.
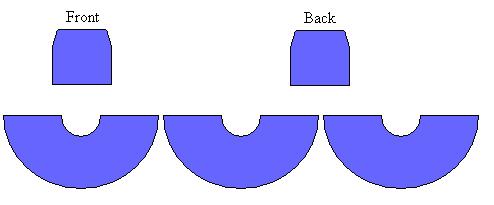
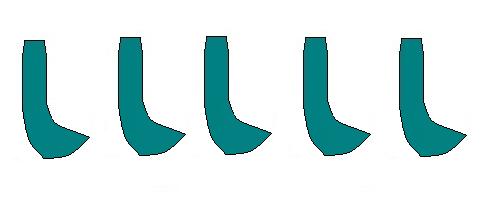
This style is very common among Bella's. It's basically a tube mini-skirt made of stretch fabric with a chiffon circle skirt attached to the bottom edge of the stretch mini skirt. I've never made one of these because they don't flatter my body type. But here is a simple way to do it. We're going to make a simple mini skirt with a front and back panel. (You may want to have a back center seam for a zipper. If so just be sure to add the 1/2 seam allowance, making the back two panels combined 1 inch wider than a single panel would be.) All the tapering will happen on the side seams.
Stretch Ratio = (stretched fabric length) / (unstretched fabric length)
H = (the circumference around the largest part of your lower hips) / (Stretch Ratio)
U = (the circumference around your upper hips for the top of the skirt) / (Stretch Ratio)
L = the length you want the mini skirt to be PLUS ONE INCH
W = the width of the panels (to be calculated)
W = (H / 2) + 1
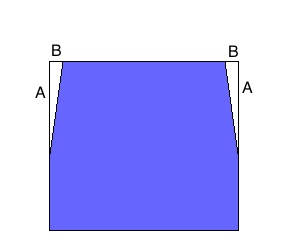
Cut out the front and back panels - each will be W wide by L long. Now to taper the mini so it hugs your upper hips.
A = the distance between where you measured U and H PLUS 1/2 INCH.
B = the width of the taper triangle you will cut (to be calculated)
B = (H - U) / 4
Cut out the taper triangles from the sides of the front and back. As you cut out this triangle, trim the resulting obtuse angle (at your lower hips) so it's a gentler curve, and have the seam follow the gentler curve as well. This will lay better on the hips.
Fold over and zig-zag stitch your waist and bottom hem, and then follow the circle skirt instructions to make the chiffon (or satin for that matter) lower half. Keep in mind that if you use a non-stretch* fabric for the circle portion, you want the "waist" hole (which will actually be at the bottom of the mini skirt) to be large enough that is won't interfere with your movement. If you're using stretch** fabric, you can use H from the tube skirt.
H = Measurement around thighs that's comfortable to move in*, or H for the tube**
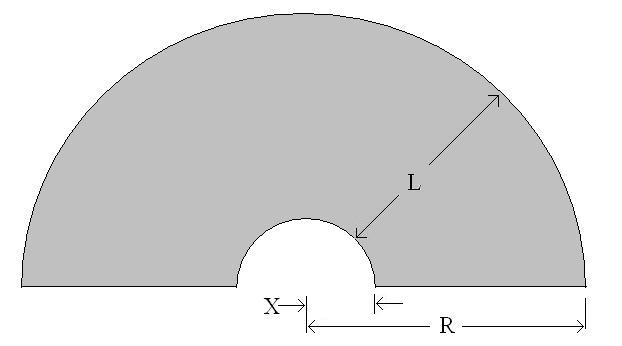
N = the number of half circle panels (2 to 3)
R = the Radius of the panels (to be calculated)
X = the radius of what you will cut out to make a hole (to be calculated)
X = H / (N * 3.1416)
R = X + L
Princess seams are seams that draw a vertical line along the body. Since the body is curved, the sides of the panels of a princess seamed garment will also be curved. You can have as many panels as you want, and you can make the angle of the flare at the bottom to be whatever you want. The key to doing a Princess Seam style well is making sure all the seams are soft curves.
Follow the directions for the Rectangle and Triangle Method (at the top) to determine the width of the top of each of your panels, and also follow its directions for the tapering. The bottom half of each of your panels is up to you. Here's another alternative, which traditionally speaking aren't exactly princess seams. It gives a spiral affect.
Sew together each of your panels (straight stitch or serge). As with all of the other styles, fold over your raw edges and zig-zag stitch (or straight stitch all but the waist).
Check out The Costume Goddess's page on Mermaid Skirts. It has three more methods to get this classic shape.