
On this page I'll explain how Ghawazee coats fit into history, how to make a pattern tailored to your own body, and the steps to make your own coat from that pattern. Here are some hyperlinks to take you directly to those sections. Though the focus of this tutorial is on Ghawazee coats often worn by women, you can also use all of the same steps to make men or women's coats, vests, or the cropped Turkish vests.
~History
~Making Your Own Pattern
~Making the Coat
To give you some historical context for this folkloric garment, let me give you the short, short version of where it came from. About 1000 years ago a cast of people from northern India migrated north west. It is theorized that they were with an army, filling various rolls that armies require, including entertainment, shoe making, black smithing, and even laundry services. The logistics of warfare throughout history is its own elaborate story, but let's suffice it to say that they were gainfully employed and left India.
This group of people are the ancestors of the Roma or Romani people. In Disney movies they're called Gypsies, but this is actually a derogatory term and a word Europeans derived from the erroneous assumption that the Roma came from Egypt instead of from India.
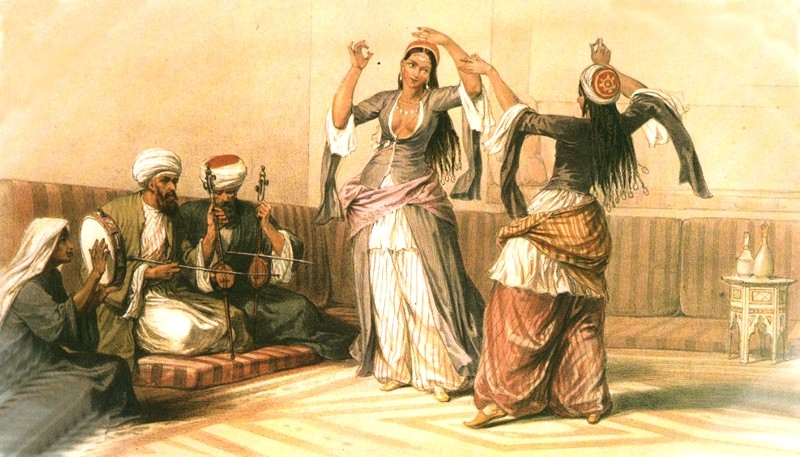
The Roma spread to Europe, the Middle East, and Northern Africa. The group of Roma who ended up in Egypt call themselves the Ghawazee (gah-wah-zee). Since their language is an Indic one and doesn't use the Latin alphabet, there are many various accepted spellings of the word Ghawazee. The garment we iconically think of as a Ghawazee coat was worn in Victorian times - late 1800's. The Napoleonic Wars were in the 1810's and brought with it many European tourists to Eqypt, creating an income for street dancers (and prostitutes). Ghawazee dancers were viewed by society as tainted whether they were prostitues or not, and though they danced in the streets, they were not typically invited to dance in people's homes. Simultaneously in Egypt there were other women who were classically trained dancers called Almehs, who only danced for other women in the harems and dressed differently.
During this era of European tourism in Egypt, an art movement called Orientalism began. European artists with more talent than researching abilities painted gorgeous but often inaccurate paintings that romantisized the Orient. The artists weren't dress makers, so it can be difficult to determine from their interpretations of what they saw how those garments really were made. From this painting alone, many people today think that oddly placed rectangles of fabric were hung from one side of 3/4 length sleeves, when it is more likely that they had long, fitted sleeves that could be partially unfastened up to the elbow.
For those of you involved in the Society for Creative Anachronisms (SCA), the Ghawazee Coat is not a "period" garment. It's relatively speaking pretty modern. It would be as silly as wearing an American Civil War uniform to a Renaissance Fair. Instead, you should wear a 16th Century Turkish entari (coat), or the looser 16th Century Persian coat which is very similar. (The amazing historical pattern company, Reconstructing History, has also now expanded its line of patterns to include larger sizes for its Turkish entari.) Yes, the Ottoman empire did at one point include Egypt. No, that does not mean that you can cite the clothing that Ghawazee wore in the 1800's and say it's identical (or even derivative) of what people wore in the 1500's in Turkey. There's 300 years, 600 miles, and the Mediterranean Sea between them.
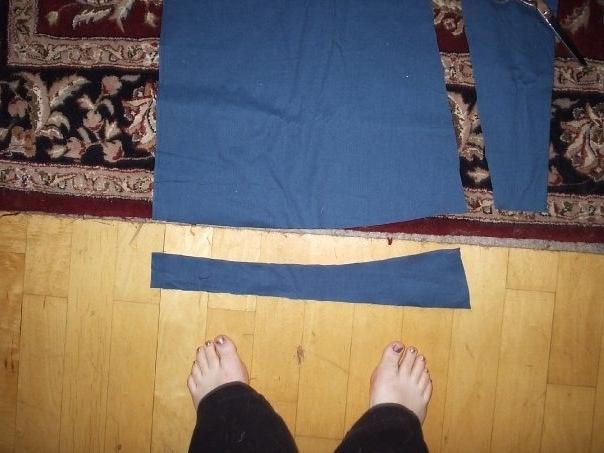
In order to make this tightly fitted garment tailored to your own dimensions, we're going to make a pattern by using your body and four identical rectangles of fabric, approxiamately 30" long by 20" wide. Use a cheap cotton or muslin, and if you're very new to making a pattern, I recommend you use a large-blocked gingham (think Dorothy Gale's dress). The squares on the fabric can help you make sure things are even. Wear as little as possible on your upper body - ideally only a bra, or possibly also a tank top - or nothing at all if you happen to be a guy.
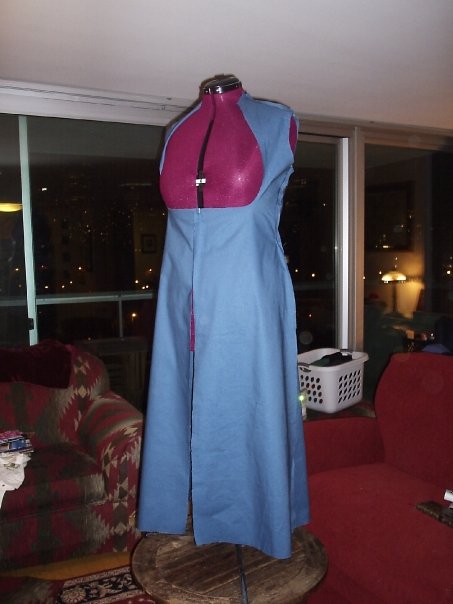
Pin the two front panels together at the center seam, and the two back panels together at the center seam. Put your straight pins in parallel to the edge of the fabric, and put them at least an inch away from the edge of the fabric, and have the raw edges at these seams facing out so you can easily adjust the pins as needed. Pin the back panels to the front panels over the shoulders - you will make this pinning more precise as we go, but for now one pin on each side just above the shoulders will keep the panels from falling off of you.
Now we start to "fit" the pattern. Starting just under the armpits, pin the front and back panels together on the sides, with the pins parallel to the seam. You can think of this like tracing your body on the fabric panels with pins. Try to alternate which side you're working on as you go down so that you don't make one side tighter than the other (this is where gingham fabric could help because you can visually compare the right side to the left as you go). Pin all the way down to the widest part of your hips. Go back to the fabric above the shoulders and pin the fabric parallel to the seam.
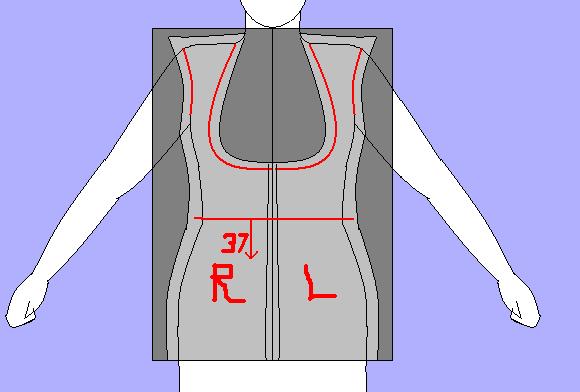
If this coat will not cover your bra area (because you want to wear it with a modern bellydance coin bra, or you're making a Turkish Vest), then use a marker or fabric pencil to draw where you'd like the edge of your coat to be (see the red line in the image below), and cut your fabric about an inch away from that line. If instead you want it to lay over breast, you may find the need to add darts on the front panel so that they better fit your chest, creating triangular fold from the apex of the breast (the nipple) to the armpit. Listen to your fabric and your body shape and work with the fabric here, not against it. As before, put your pins in along where your seam would lie.
For the neck hole, draw your neckline on the back of the neck, cutting an inch away from that line (have your last pin in the center back seam end at the line). Your line will be a small curve connecting the shoulder seams on either side to the center back seam, where the curve might only be an inch or so away from the top edge of the panel. You can find your ideal curve while wearing the panels and marking with your marker or fabric pencil where you'd like the neckline to be, or you can use another shirt as an example. In any case, mark where you want the neckline to be and cut the fabric an inch away from that. Only pin the panels together on the center back seam and shoulder seams up to that line so see how well it fits.
The front portion of your neckline can vary quite a bit due to taste. In drawings and paintings, the most common neckline was a deep V for Ghawazee coats. But the neckline of Turkish vests actually cuts underneath the breast area, which can allow a decorative costume bra underneath to be seen. For that reason, often bellydance costume Ghawazee coats have a Turkish Vest front neckline. Remember - it's a costume, not a historical re-enactors garment. Make it in what every way best meets your needs.
You'll follow the same process for your arm holes as you did for the neck hole. Mark where you'd want your sleeve seams to be, or finished arm holes would be if it is to be sleeveless, and cut the fabric an inch beyond it.
Once you've cut the arm and neck holes, the garment will most likely be looser, so alternating which side you're working on, walk in your pins along the side seams. Don't make the pattern skin tight - ensure enough give so that movement is easy. On the back center seam, you may need to pin it tighter around the small of the back. It depends on your shape. However, you want to keep the center front seam as straight as possible so that it's easier to apply trim.
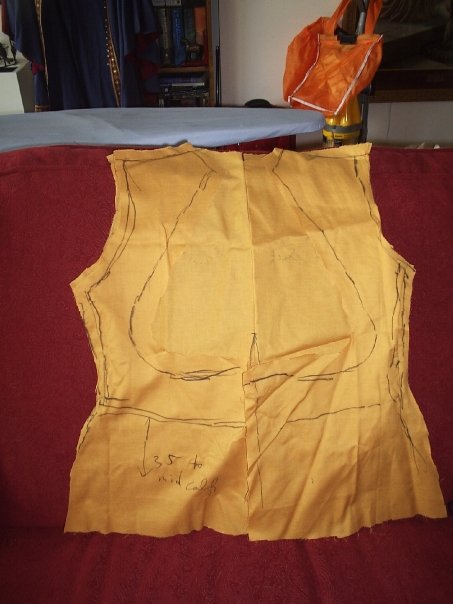
As you're doing this whole process, check from time to time that your center front and back seams are still centered, and your side seams are directly on the sides. When you're happy with the fit, use your magic marker to draw a line along the seams on all four panels, litterally drawing over your pins. Trim the fabric about an inch away from your pins. Draw a line along your waist line (wherever you define that as) on all four panels and using a measuring tape determine how long from your waist you want the coat to be. Write that number and an arrow on your pattern. Write "R" and "L" on the panels so you know which are the right and left sides.
Now, no matter how hard you try, odds are your right sides and left sides won't be perfect mirror images of each other. But we want them to be. We want the right and left panels to be mirror images of each other, and we want the side seam edges of the front and back panels to be identical curves. Now, it's too much to expect your pinning alone to lead to such perfect panels, but I'm going to teach you how to fix them.
After you've drawn your seam line on each of the four panels over your pins, unpin them. Lay the right front panel on top of the left front panel, hold them up to the light, and you'll be able to see both sets of the marker lines you drew over your pins at the same time. This is where adding an inch around all of your marked lines comes in handy, because you can use a different color marker to show where the average of the two lines should be. This is what I like to call "normalizing" our pattern pieces. Using another color or maker or pencil, draw identical new lines on both panels where you think your seams should be. Repeat this for the back panels, and be sure to compare the side seams of the front and back panels to each other as well.
When you've come up with a good guess, sew your pattern pieces together on your corrected lines and try it on. Happy with the fit? Great - trim the fabric 1/2 inch from your seams and cut out your stitches. Not happy with it? Make changes, sew it again and try it on, till you are happy. Once you've trimmed and seam-ripped your pattern pieces (so they're separate panels again), pick the cleanest of the two front panels and the cleanest of the two back panels, and they will be your custom made pattern pieces.
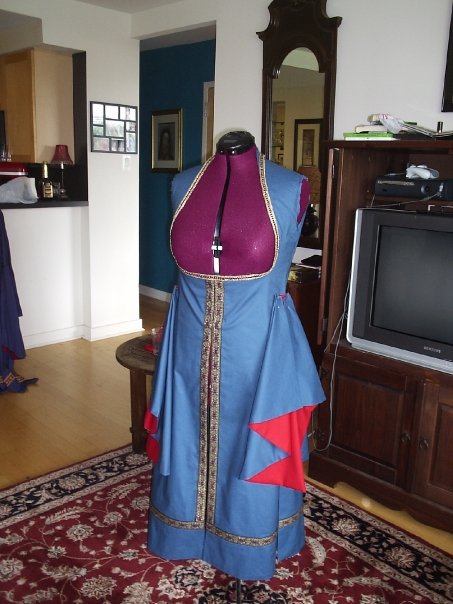
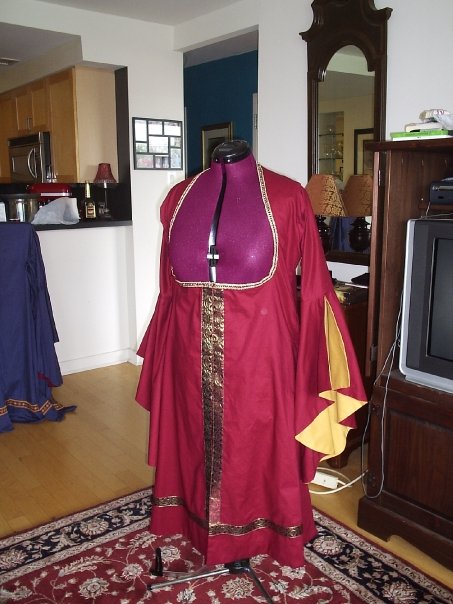
There are some choices you can make. I like my Ghawazee coats to be fully lined on the body, unlined on the sleeves, and lined on the arm drapes. It's personal preference. A cheaper coat could be not lined at all, and a more expensive coat could include lined sleeves (but that gets hot). Sleeves themselves are an option. You could choose to make your coat reversible and another color inside.
The hook and eyes (or whatever closure you prefer) will keep the coat closed in the front from as high up as you want to as low as you want. You could button it to the waist, to the hips, or to the floor. I like it to button it from just under the bust to the mid hips because then there's not some weird triangle of flesh above my hip scarf. Also, another thing to decide is if you want your four panels to be attached all the way down (like a dress), or unattached (slits on the front, sides and back). I tend to have them unattached from the mid hips down, so my colorful skirt underneath can show.
In any case, here is how you use your pattern pieces to make your four panels. Folding your fabric in half widthwise (so you cut out two panels at once), pin one of your two pattern pieces (front or back) to the fabric. Measuring from the waist line you had marked on your pattern piece, use a measuring tape or string to mark the length of the skirt of your panel with a shard of soap or a fabric pencil (for a fuller skirt, make the angle larger). Pin the two layers of the fabric together along where those edges will be so they cut cleanly.
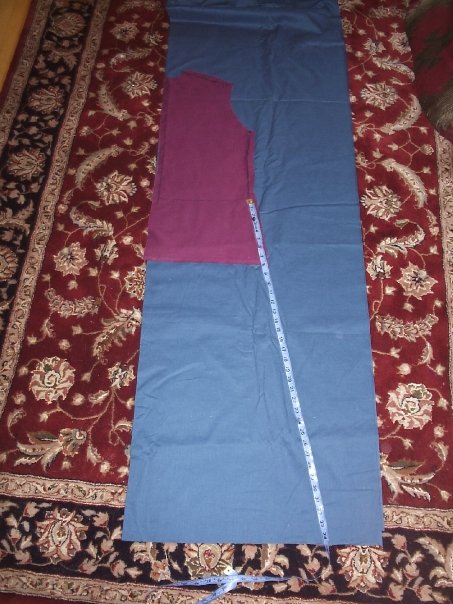
We want to cut the bottom of the panel so that it has a smooth arc that will hang all at the same length. I usually just do this by eye, but if you're nervous you can use two tight strings lined up with the two sides of your skirt, and where those strings cross is the centerpoint of the arc (it's about at throat level). Use the method dicusses for the circle skirt to draw your arc with a shard of soap or fabric pencil. An alternative method would be to fold the fabric in half widthwise so that the outer edges of the sides line up, the waist marks line up and the bottom hem marks line up. Now fold it in half again so that the fold you previously made lines up with the edges. Mark with soap on the new fold where the hem marks are, and make an arc that links those three points. The arc will be very subtle.
So you've cut out your four outside panels, and if you're lining it, you've cut out your four inside panels. I tend to use the same fabric for both, but a contrasting fabric of the same type could look very nice, or if your outside is an ornate brocade, a solid color cotton or linen inside would do. Linen is better than cotton for hot weather. Sew the outsides together. Sew the insides together. Use a straight machine stitch.
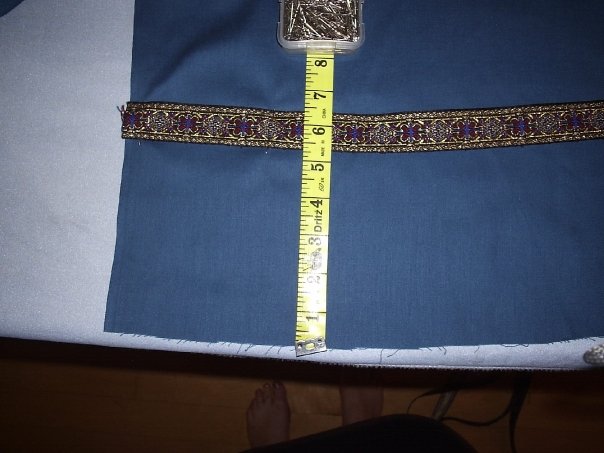
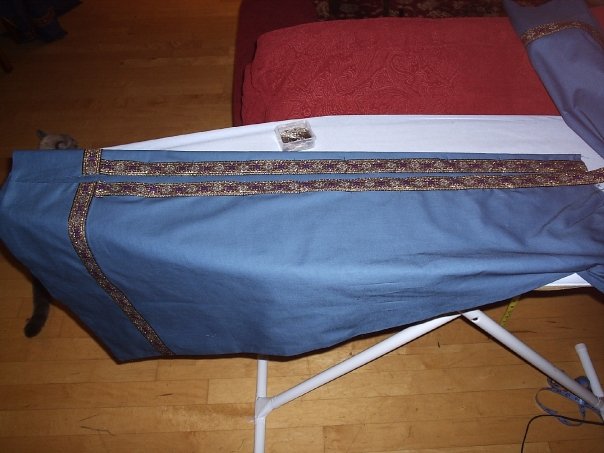
Now if you're going to sew any deorations onto the outside of the panels, such as a brocade ribbon a few inches above the hem, top stitch (straight machine stitch) these directly onto the panels, being careful to pin them on in a formation that mimics the arc of the hem, and making sure the ribbon is the same height on all four panels. (For trim that goes on the neckline and front closure, you can wait till the lining is attached.)
Sew the inside to the outside all along the hems, slits, front center seam and neck line, good sides facing in. On any corner, trim off the tip of the raw edges. On any curves, clip little perpenticular cut into the raw edges. Without doing this, the raw edges beyond the seams could be bulky or lumply inside the garment. Reaching through one of the arm holes, pull the garment right-side-out, and iron all your edges. You may need to use a chopstick to help get any corners of your panels to fully come right-side-out.

Once it's all ironed, pin any desired trim to the front closure and neckline. If your trim has a recurring pattern on it, line the front closures up next to each other while you pin the trim on, so that their patterns line up. Top stitch it on with a straight machine stitch.
If your coat will be sleeveless you can fold in your arm hole's raw edges, top stitch it, add trim, and then start sewing in your hooks and eyes and call it a day. I like sleeves, myself. Modern sleeves have a hump at the top. It's designed to make the sleeve lay nicely while the arms are down. Medieval sleeves, on the other hand, are just parallelagrams, designed for the arms to be straight out. The total length is the same, and you end up with more bunched up fabric in your arm pits when the arms are down. If the hump intimidates you, just do a medieval sleeve. Or you could sacrifice an old shirt and use the top of it as a pattern. For either, measure the largest part of your upper arm and add an inch or two for the widest width, and then measure around your elbow and add an inch or two. Here is a drawing of a modern sleeve.
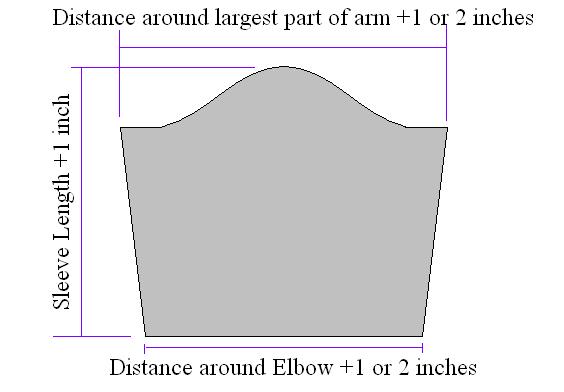
Although no one in history ever wore the large half oval drapes on a Ghawazee coat, I think they're pretty. To make the drapes pictured below (pinned to the costume) I just cut out two half ovals of the blue, and two of the red. Sew them good-sides in, and cut a little half circle so they can attach to the bottom of your sleeve, trim the raw edges inside, and then pull them right-side-out through the half circle hole you made. Use or R = (pi)/C, where C is the distance around your the bottom edge of your sleeve plus 1 inch (seam allowance), to determine how to make that elbow hole. Baste stitch (fancy word for top stitching with a straight stitch to keep two layers of fabric together) the elbow hole.
Sew the sleeve tube closed, good sides facing in, and fold over your seam to hide raw edges and zigzag or straight stitch it - or you can use a serger. Pin the sleeve to the coat, good sides facing in, lining up the sleeve seam with the side seam of the coat. Finish that seam the same way (though try it on first just in case). Then sew the arm drape onto the end of the sleeve with the opening centered on the hollow of the elbow.
Attach hook and eyes to the inside of your front closure, and keep them no more than an inch apart to prevent the fabric from creating gaps or bulges. If you like you can sew decorative buttons on top of the hooks, or you could use rope knots and loops as buttons. It's really up to you. Unless you're going to a Historically Accurate 1870's Ghawazee Costume Convention, the only thing that really matters is that you like it.
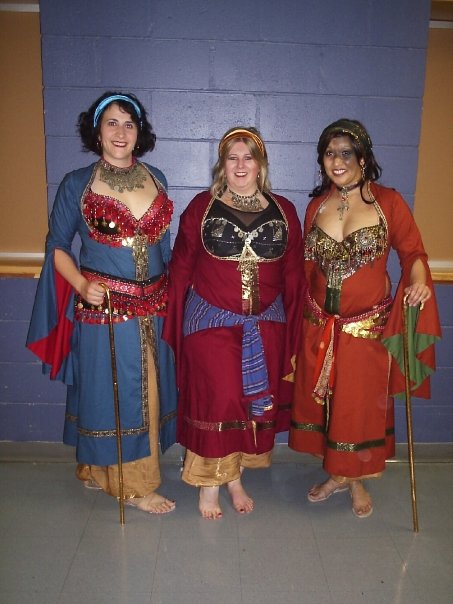
Here's a picture of my teacher Alexia (center) and my troupe mates Jen and Donna in their new Ghawazee coats.
Here is a video of me in my Ghawazee coat with Sean in his 16th Century Ottoman Turkish Caftan (which I made him for Pennsic). We're doing an Egyptian cane dance called the Tahtib, which is a martial art and dance performed by shepherds (not Ghawazee), and we're dancing to a song called Rumelaj (Macedonian Romani Folk Song), so it's a bit of a smorgishboard.