
 "Haram" is the Arabic term for sanctuary or forbidden place. It would refer to the area in the home that only female members were allowed to be in. During the 19th century an artistic movement called Orientalism began, where the West started to become more influence by Eastern fashion, art and culture. Women in Turkey and parts of the Middle East during that time wore very different clothing to their counterparts in Europe. Varrying from country to country, women would wear loosely fitting pants under ankle length flowing shirts, on top of which they wore more fitted vests, robes or jackets. This was their indoor clothing, seen only by other women, and it would be completely covered if they were outside of the home by outter garments. For a wonderful and illuminating explanation of those and other historical garments, I suggest you check out Reconstructing History's Eastern patterns, and especially their Ottoman Turkish Women's Getting Dressed Guide.
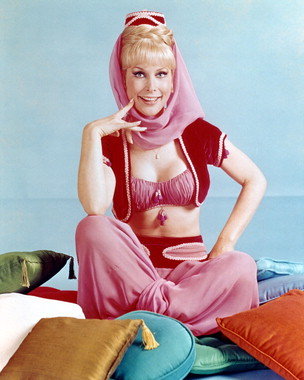
With the cultural revolutions that the Great War (WWI) ushered in in the beginning of the 20th century, and the advent of movies like The Sheik, "harem pants" captured the imagination of Western women tired of corsets and petticoats and ready for fashion that would shock the neighbors. With the flappers came the vamps. What bellydancers today often wear under their skirts, demonstrated above by the lovely Barbara Eden of "I Dream of Jeannie," are modern versions of those traditional Middle Eastern pants.
That being said, the human butt has been approximately the same for the past 195,000 years.
Your Butt is your Pattern: Harem pants are very simple. Start by cutting out two rectangles. The lengths of your rectangles is going to be from where you want the top of your pants to lie to where you want the bottom of your pants to lie, plus one-to-three inches (I'll explain more below). The width of the rectangles is to a large degree up to you - for the least full harem pants, make each rectangle at least as wide as half the circumference of your lower hips (the largest part of your butt) plus an inch for seam allowance. So if your lower hips are 40 inches around, your panels would need to be at least 21 inches wide. (If you're pregnant or apple shapped, you may need your minimum panel width to be even larger than your lower hip circumference would dictate.) But most people prefer very full harem pants with baggy legs. The extra fabric will be gathered at your upper hips and your ankles. The part that does not change regardless of the fullness of the pants is the curved cut-outs in the upper two corners you'll make for your crotch seams.
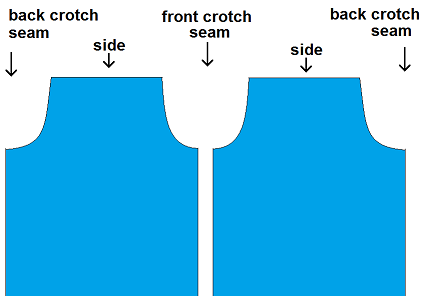
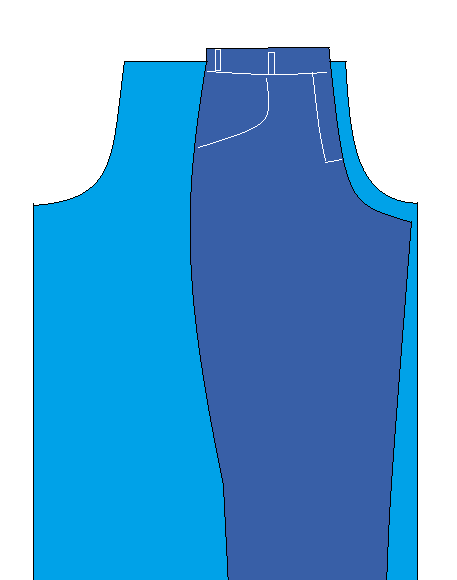
Now the question you're wonderings is: how do you make those curves for the front and back crotch cut-outs? I'm going to let you in on a little secret - you probably already own a pair of jeans. And rest assured, you do not need to rip them apart to use them as a pattern. The easiest way to get a clear look at the crotch seam is to take one leg and stick it inside out inside the other leg. With the crotch seam on one side, press your jeans so that the front of the leg lies as flat as you can make it. If your jeans are low rise and already lie perfectly where you want your harem pants to lie, line them up with the top of your rectangle. If they're higher, have them hang over the edge of your rectangle. Then using a magic marker, fabric pencil, or shard of bar soap, trace half an inch away from that crotch seam in the corner of one of your panels. Now, you'll notice that the crotch cut-out curve in the back is a bit deeper than the crotch cut-out curve in the front. That's cause that's where we keep our booties. To get the back crotch cut-out curve, press the jeans flat so that the back part of the leg lays as flat as possible, and trace that curve on the other corner of the same rectangle. Your right leg panel will have the front crotch cut-out on the right corner and the back crotch cut-out on the left, and the left leg panel will be the mirror image of the right leg panel.
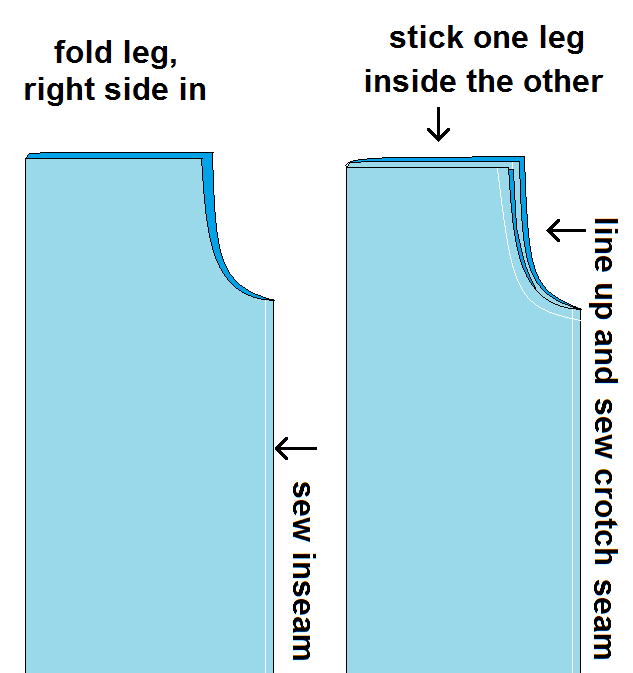
Once your leg panels are cut out, you'll sew up their inseams. The inseam is the seam that runs from ankle to crotch on the inside of your legs. Fold the leg panels in half so that the side edges line up with the right sides of the fabric facing in, straight pin them perpendicularly to the fabric edge, and do a straight stitch half an inch from the fabric edge. Finishing your seams on the inside will help your pants last longer through wear and tear and repeated washes. If you have a serger you can finish your seams with it (it basically seals raw edges in thread), or you can zigzag stitch them with a regular sewing machine. Another option is to fold in the raw edges of your seam and sew a straight stitch just off the folded edge to seal in the raw edges. More advanced sewers may want to try a French Seam. At this point you should have a right leg and a left leg. Turn one right-side-out and stick inside the other leg which is in-side-out (the right sides of the leg fabric should be facing eachother). Line up the crotch seam edges and sew that half an inch from the edge with a straight stitch, finish the seam as you like.
For the waist band, we're going to make a fabric casing for an elastic waist band. Click on the link to jump over to the Circle Skirt tutorial where I explain in detail how to make your waist band and insert the elastic. You'll sew your waist band to itself on the short ends, right sides in, to make a circle. The length of your waist band will be the same as you'd make for a circle skirt, but unlike the circle skirt tutorial you'll need to gather the extra fullness of your harem pants into the waist band. You have two options - "curtain rodding" it, or pleats. By "curtain rodding", I mean you take a needle and long piece of thread and go in and out of the top edge of your harem pants at even intervals (maybe every half inch to an inch). Then gather your extra fabric along that thread like curtains on a curtain rod. Loosen or tighten it till it's the same distance around as your waist band, pin the band and pants together as you do in the circle skirt tutorial, and straight stitch. Remove your "curtain rod" thread and disgard it. Fish in the elastic and finish the fabric casing as instructed in the Circle Skirt tutorial.
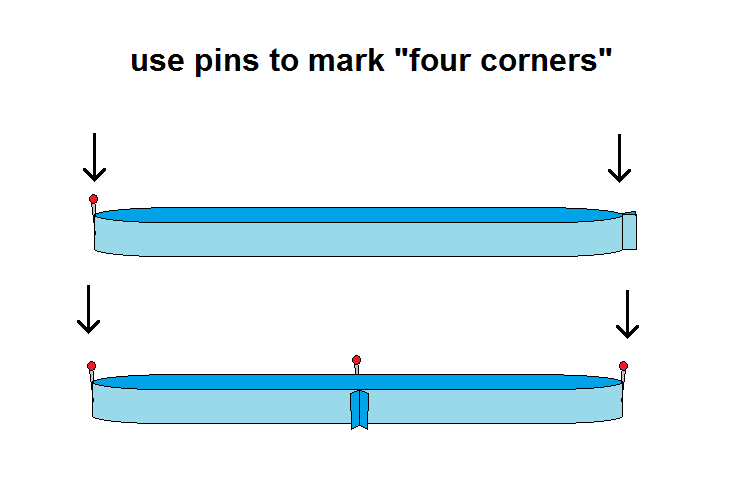
The other option, pleating, takes more time but looks nicer and lies flatter. We're going to make a series of even folds, which you could meticulously measure out, but this is a short cut that always seems to work nicely for me. Lay your waist band on a table, seam on one end and fold on the other, and mark the fold with a straight pin. Open it and lay it back down so that your seam and pin are now in line with eachother in the middle with new folds on the sides. Put pins in those folds as well. You have marked the "four corners" of your waist band. Do the same thing on the top of your harem pants, which will of course be much larger.
Now line up the seam of your waist band with the center back seam on your pants, and line up the remaining three quarters with each other, pinning the pants to the waist band. Make sure the right side of the waist band is facing in, just like in the circle skirt tutorial. You'll end up with an even amount of extra pants fullness for each quarter of your waist band. Find the mid points between the pins on the waist band and the coordinating mid points between the pins on the harem pants, and pin them together. Keep halving the distance, pinning the pants to the waist band. Eventually you'll have even gathers. To make them pleats you can put them all to the right, push them all to the left, or center each pleat which is called "box pleats". Make them as small or as large as you like. Finish the waist band and fish in the elastic as instructed in the Circle Skirt tutorial.
Now remember earlier I said to add one-to-three inches to the length of the your rectangles? It's because we have two options with finishing the ankles. You could make "waist bands" for the ankles out of your fabric, making the band just large enough to get over your foot. If you have incredibly full and baggy harem pants, this may look more polished. If you decide to go this route, merely add one inch to the length of your rectangles as a seam allowance. If instead your fabric is thin enough or your harem pants small enough, you could add three inches the bottom and fold over the extra fabric to become its own casing for the elastic. In either case, fish the elastic into your casing as you did for the waist and follow the Circle Skirt tutorial to connect the elastic and seal up the casing.
Boom! Harem pants!