
On to How to Alter Bra Cup Sizes
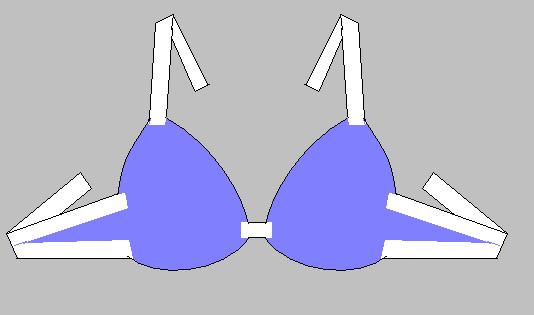
There are three types of straps that come off of the bra. The bra band attaches the sides of the cups to your rib cage. The shoulder straps attach the top of your cups and either connect behind the neck as a halter or connect to the back of the bra band. The last strap that we ususally forget about is the short connector between the cups.
You've bought the right size bra cups, or made alterations to make them the right size (go to the Bra Base Page for more info). Now to make the bra fit you perfectly, these three straps may need to be made longer or shorter.
Making things shorter is easy! For the bra band or halter style shoulder straps, typically all you need to do is reposition the hook and bars. There are detailed instructions for that right here. If the extra strap lengths get in the way after the hook and bars are moved, you can choose to cut off the excess length. To understand how this is done correctly, let's look at the anatomy of a strap.

Among all bra strap types, there are two constants - an outside fabric and an inside structure. The outside fabric is whatever decorative fabric the bra is covered in. Often the outside fabric is covered in beads or sequins, and if so you may need to remove some of them to do the next steps. The inside structure could be made of a strip of grosgrain ribbon, a strip of canvas, buckram or interfacing, or a combination of those materials. I always use grosgrain ribbon (go to materials for more details), and often I'll use a strip of interfacing cut to the same width and length to reinforce it. Lining, believe it or not, is not always present on straps. If it is there it will most likely be spiral stitched on the sides. Snip the stitches and peel the lining back. The removal of the fabric, lining and beading will only need to occur to the point at which you want to shorten the strap.
Once the inside structure is revealed, you can cut it where you want the new length to be. Cut off the outside fabric about 1/2 to 1 inch longer than the inside structure and fold the fabric over it. Hand or machine sew the fabric in place. If you are attaching a lining you may want to just straight stitch the outside fabric on the sides. If instead your outside fabric wraps around completely AND you intend the cover the strap with beads and sequins, you can just zigzag stitch (machine) down the center. At this point you would re-apply any beading. To reattach the lining (if there is one), trim it to 1/2 to 1 inch longer than the strap, fold the raw edges under, and spiral stitch (hand) the lining to the outer fabric. The last step would be to re-attach your hook and bars.

For shoulder straps that connect to the bra band in the back (cross or regular configuration), you have two options: you can move the attachment point of the straps on the cups or on the back. In either location, snip open the spiral stitches holding on the lining (if there is one), and carefully cut only the stitches attaching the shoulder strap to the rest of the bra. Use the straight pin trick listed in the hook and eye page to determine what the attachment point and new length of your straps should be. Push the excess strap down into the lining, and use a hand sewn chain stitch to reattach the strap. Spiral stitch up your lining and you're done. If there is no lining and you have excess strap, you can tack it down with a few stitches. If there is too much excess strap and it causes a lump you can just cut it off, using the method listed above. I prefer to keep length if possible to make future alterations easier.
Center Cup Connector: If you need your bra cups to be closer together or further apart, you will need to temporary remove the nearby lining to see where the center connection is sewn to the cups. Carefully cut only the threads holding on the connector, and then reattach it with a chain stitch by hand. You may need to actually make a new connector strap - if so try to find as close of a fabric as possible and use the materials and methods listed below for making straps. Fold and pin the lining back in place and spiral stitch it back to the outer fabric. If your bra doesn't have a center strap but instead the cups and what connects them are all one structure, your solution will vary. Feel free to email me pictures and ask for help.
The angle of this attachment has plagued many a dancer. Rest assured that there are a range of good angles, but keep in mind that the center connector and the bra band should be inline with one another. That is NOT to say that they will be the same height, but to say that their line of tension is parallel to each other and to the ground. See the figure below.
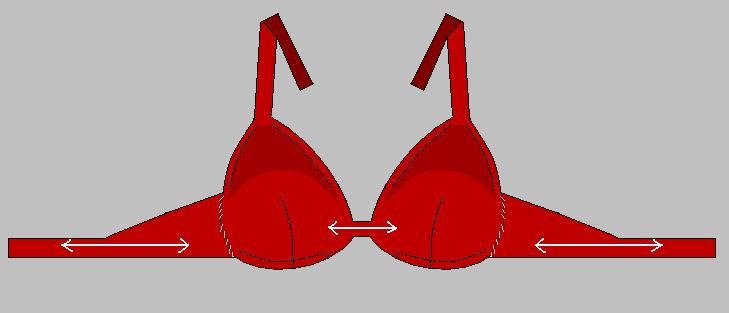
Now, even if the connector and the bra band are correctly aligned to one another, it is possible for the cups to be attached at a variety of angles. In this case you should let form follow function. Connect your side straps first, and lay them on a table with the side straps in a line - the line in between them is the line you should put the connector on. Side straps connect at two places on the cup: at the top of the underwire and a few inches below it - not at the bottom of the cup but at the point where the tangent of the underwire is at a 45 degree angle to the ground. Since people come in such a range of sizes, I can't tell you exact distances, but you can use the image below as a guide. The resulting triangle could be open in the center, creating a peek-a-boo type hole, or it could be completely filled in with fabric and interfacing. The grosgrain ribbon is only neccessary on the edges for tensile strength.
To make a new strap or an extension to a strap, start by creating your inner structure (grosgrain ribbon & interfacing sewn together, or just grosgrain). If your structure is made of multiple layers of materials (grosgrain & interfacing) stitch them together first. Attach it to your bra and then cover it in the appropriate outside fabric and beading, lining optional. If you're extending an existing strap, take off the outside fabric so that you can attach your new strap directly to the inner structure of the existing strap. For new bras, I actually cut and sew all of my grosgrain and interfacing together in one long strip and then cut it to the lengths I want, and then attach them to my cups. I cut each strap longer than I know I'll need, because I can always shorten them before I cover them in fabric. The connector is easier to cover with fabric first before you attach it to the cups.

Sometimes I like the connector that a bra base I've purchased already has, and I just cover it in fabric. Sometimes I also use the bra band that came with the bra and cover it in a stretch fabric, only using two squares of interfacing on the back so that the hook and bars have a more stable place to be attached. I did this for my Silver Lotus costume. Stretchy straps can be more comfortable, but sweat can cause elastic to detriorate over time. Since costumes can't be thrown in the washer, people have traditionally made un-stretchy straps and added removable elastic to them. Do what makes you happy.