
The use of beaded fringe became popular in the 1910s and 1920s. At the time, Hollywood was making silent films like the Sheik showing fantastic and fictional adventures in the exotic Middle East. Hollywood completely made up the costumes, and they reflected Americans' desire for escapism and glamour far more than anything authentically Middle Eastern. People in Egypt and Turkey watched these films as well and started dressing their dancers like them to attract Western tourists to their night clubs. However on a practical level, beaded fringe lends itself very well to bellydance movements. It can accentuate twisting movements, spins, and even shimmies. Because of this, the use of beaded fringe, in various styles and lengths, has continued as a trend in bellydance costumes ever since.
Here is a hyperlinked table of contents for the sections covered below:~Beaded Fringe
~Beaded Swags
~Shushanna's Beaded Swags
~How to Attach Pre-Made Fringe and Swags
~How to Make Your Own Fringe and Swags
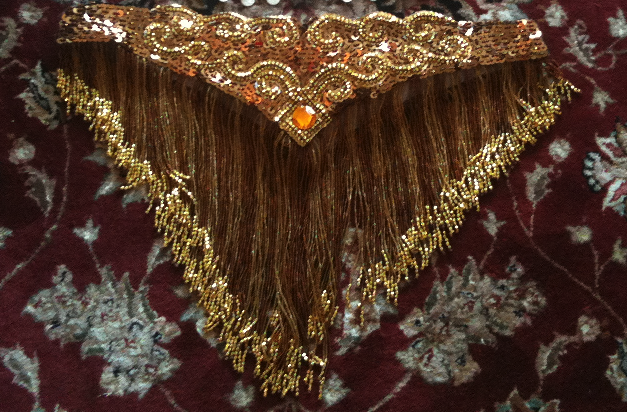
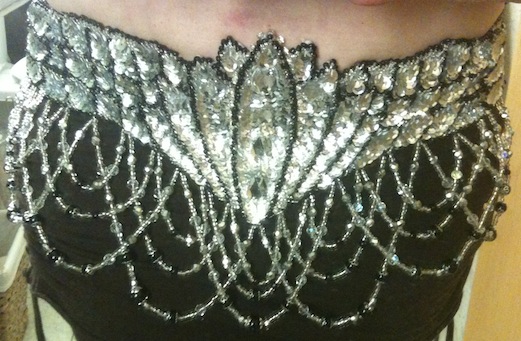
A strand of beaded fringe is made of button-and-craft thread (or any strong thread) with beads strung on it, and it's connected to your costume with a double knot on one end and it is free to swing from that connection point. Lengths typically vary from two inches to twelve inches, and the strands of fringe are either attached in a line along the bottom edge of a belt, layered in horizontal lines over a whole bra or belt (covered in fringe look), or applied in clumps. The fringe can all be the same length, or as in the picture below it could change in length to enhance the shape of the costume. The beads could be all the same size (typically hex-cut seed beads), or they could be mostly seed beads with larger accent beads or coins in a certain pattern on the bottom inch of the strand. You can attach each strand of fringe directly to your costume, or you can buy pre-made ropes of fringe and attach them to your costume. Most designers buy pre-made ropes of fringe for $25-$75 a yard. I tend to make my own fringe and sew it directly to the costume, but the time it takes is astounding, and it's probably more cost affective to buy it.
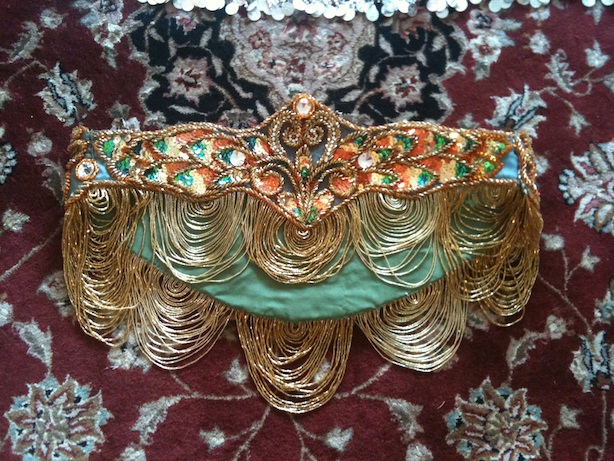
Beaded swags are also strands of button-and-craft thread with beads strung on them, but these strands are attached to the costume on both ends instead of just one. A strand of a swag will hang in a beautiful parabolic arch, and typically the strands are hung in concentric arcs of hex-cut seed beads - like an upside down rainbow all in gold or silver. These can be bought pre-made and attached to a rope, or you can make them yourself. In the image below of my Hanan Fall-Colors belt half of the swags were pre-made and came with the costume, and the other half I made myself, replacing the fringe that had been between the swags (fringe and swags always get tangled when next to each other).
I personally like another type of beaded swag, which I may have actually invented - single strands of E beads and larger accent beads strung in a symmetrical pattern, hung in a geometrical sequence in relation to the other strands and the circumference of the costume. Boy, that's a mouthful! But you'll understand what I mean when you look at the picture below. Here you see my Silver Lotus belt which I designed myself, and below it a Berries (what my husband & I call it) belt I had bought from The Belly Dance Shop and altered.
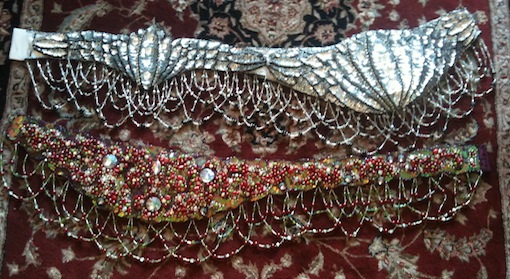
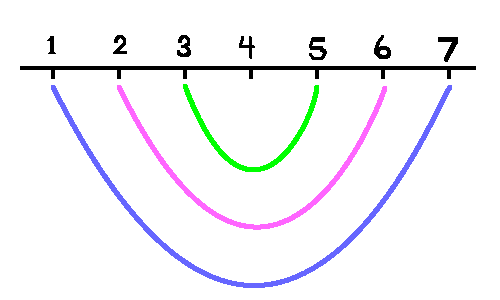
The swag strands are attached to the costume at even intervals, causing how the swags cross each other to make its own pattern. The Silver Lotus costume has small, medium and large strands hung in intervals of six gaps, or seven attachment points. Here's an illustration to explain. The largest swag is attached at points 1 and 7. The medium swag is attached at points 2 and 6. And the smallest swag is attached at points 3 and 5. Point 4 will become the point 1 for the next swag trio and it was point 7 for for the swag trio that came before it. The Berries belt is done with a similar method, but as you can see there are only large and medium swags, and instead of 7 points, the pattern is done on 5 points.
To layout the attachment points on your belt or bra, you'd measure the total length along the edge (with the hooks closed) and divide it by the number of gaps (attachment number - 1) times the number of odd swag groups (cause the even ones overlap with the odd ones). Or you can mark your center front, center back and sides and just wing it. I use straight pins or soap marks to indicate where the attachment points will be, and then I sew all the odd trios on first, and then all the even ones behind them (keeps them from getting tangled). I imagine that the reason costumers haven't done this before is because it requires very precise measuring and math. It's much easier to just attach a pre-made rope of fringe, or attach pre-made concentric swags with accent fringe making up the gaps between them (Hanan does this all the time). There's nothing wrong with those types of costumes, and they are much easier to alter to fit a variety of sizes. My method has to be custom fit to the dancer. Here's an up-close picture of me wearing the Silver Lotus belt, so you can see how the swags hang.
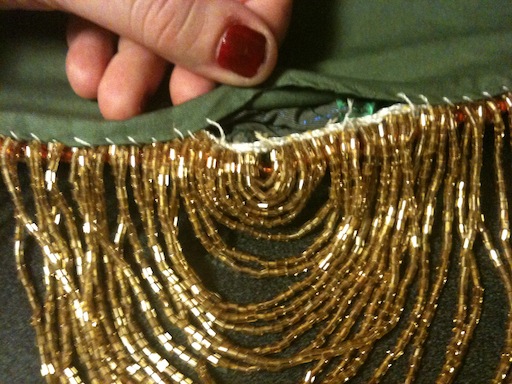
Pre-Made beaded fringe and swags are sold by the yard or by the swag by various costume vendors. Typically the beaded strands are attached to a rope or shoelace with double knots at the ends of their thread. To attach that rope to your costume, temporarily remove the lining from the edge of your bra or belt, spiral stitch the rope to the back of the costume close to the edge just catching the inside of the buckram or interfacing, and then spiral stitch the lining back on - completely concealing the rope. If you want, there can be a lining stitch between each strand of beads, but between every other or every third strand is also fine. If your costume doesn't have a lining, you may want to add one. The lining protects the knots holding the strands onto rope - without it, your rope may unravel, and your beaded strands may fall off. I've pulled back the lining on my Hanan Fall Colors belt to show you what it looks like.
Though it is far faster to use pre-made trim, sometimes it's necessary to make your own. Fringe hanging off of the middle of a bra cup or the middle of a skirt looks better when the strand comes directly out of the fabric. To use pre-made fringe you'd have to hide the rope it comes on somehow, and that can get bulky. Or, maybe the precise look you're going for just doesn't exist anywhere - fuchsia and teal plaid fringe might be hard to find. In order to start, you must first tie a double knot at the end of your button-and-craft thread. Push the needle into the back of your costume piece through to the front, with the needle coming out exactly where you want the strand to be anchored. I usually start a third of an inch from the edge on the back and angle down to come out of the very edge of the fabric for fringe that goes on the bottom of a bra or belt (see the picture below). (Notice how there are no knots directly on the gore I had added to tailor the belt - the strands coming out right below the gore are knotted to the left and right of the gore, because the gore itself to too difficult to sew through.)

That being said, you can also make your own rope of fringe - meaning you attach it to a rope or a shoelace instead of directly to your costume. This way you can decide after you've made your swag or fringe exactly where you want to place it on the costume. Also, you can reuse the fringe or swag on a new costume project if this project doesn't turn out the way you wanted.
You may want your first bead on the strand to be a round seed bead or E-bead (go to Materials for more details) because it can protect the thread from being cut by the sharper edges of bugle beads or hex-cut seed beads. Use a measuring tape to help you decide how long you want your strand to be, and fill your strand with beads until it is almost exactly that length. For fringe I hold the measuring tape up to every single strand to ensure the length is right, though if you're not worried about strands getting longer or shorter as you go, you could do it by eye. For long swags that go on the bra from the sternum to the back of the bra, I always use a dress form or put the costume on and do it by eye, since the curves of the rib cage affect things greatly.
If you want your strand to be fringe (attached on one end), end it with a round seed bead. Push the needle back through the same seed bead a second time (thread will loop around seed bead) and if necessary use your pliers to pull the needle through (use a larger seed bead for this to make your life easier). You will make a loop - put the needle through that loop to knot the seed bead in place at the end of your strand. Then, carefully double knot your thread at the end of the strand, trying to push your knot as close to the seed bead as possible. Cut off the excess thread, but not too close that you may unravel the knot. If you want a thin metal stamped coin or payette on the end of your strand, add it after the seed bead is locked in place but before the double knot, leaving some looseness in the loop through the coin's hole (sharp edges of coins will cut your thread if it's too tight). As a last step, tug on your strand. This will tighten the double knots on both ends of the strand of fringe, and also give the beads a little breathing room. Strands of beads that are too tightly packed don't swing as fluidly. The extra space in your strand should be equal to 0.5 - 1 times the length of a seed bead. The distance between strands is up to you, but I recommend a little breathing room. Be able to see light between your strands. Here's a video showing how to make a strand of fringe.
If you want your strand to be a swag (attached on both ends), follow the same method above to start your strand, but end it with a sewing knot, which is described in detail on the How To Sew By Hand page (follow the link). For your outer most strand, you could measure how long you want it to be, and then measure how far along the edge of your fabric you want it to span. Hang your measuring tape in its place and play with it till you like the way it looks. Then make each of your swags to approximately the same length (number of beads) and span (distance along the costume edge). For my type of swags with the larger accent beads, you will have measured and marked where your attachment points will be, and you'd determine a nice pattern for your E beads and accent beads that will be symmetrical for each of your strand lengths. When making beaded necklaces, jewelers use a rectangular platter with a gore in it where they can line up their beads in order, so they can start their designs in the middle and add to both ends till they get to the right length. You could use the fold in a large book lying open on a table to the same end. You can line the beads up in the valley where the pages meet.
To find out about great online suppliers of the types of beads I use, take a look at the Resources page. There I'll also show you links to other websites with costuming advice, patterns for sale, and various costuming materials for sale. Check out my Half-Made Faux Blue Bella Project for more video tutorials showing a costuming project from start to finish.